IVR
Welcome message
IVR Welcome message Access Restrictions:
|
Customer |
This control
is part of the Auto attendant capability so customer must have subscribed to Contact
Pro to access it. |
IVR
Description
The IVR Welcome message control can be used to build
interactive call handling where the calls are to be routed according to options
selected by the caller. An example, might be where a company has different teams
answering enquires on billing, product support and new sales.
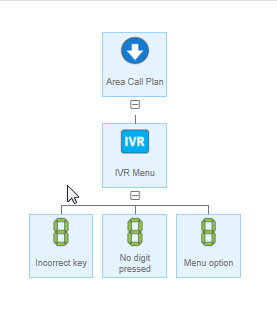
The only valid child nodes for an IVR Welcome message
controls are Menu Options. To build up a complex IVR hierarchy you can make IVR
Welcome message controls the children of Menu Option controls as in the example
below.

IVR Tip
Don’t forget to program the Incorrect key and No Digit
Pressed for callers that select an invalid option or fail to select a valid
option at all.
There is a generic (System default) “You have selected an
incorrect key” announcement already uploaded to the platform which can be used.
Following the Incorrect Key announcement, the IVR announcement will then be
replayed to the caller.
The No Digit Pressed node is optional. It can be used to ensure a business does not
disconnect callers where they fail to select an option, or for some reason it
is not being recognised by the platform.
You would then configure, essentially, a default route for these callers
(customer service etc.). The option can
also be used where you want to announce for the caller instead of pressing a
key, please hold to be connected to the … “switchboard, reception etc.
It should be noted that the afore mentioned “hold” time
(where this option is selected) has a duration of approx. 3 seconds, and only
triggers after the IVR announcement has repeated according the IVR
configuration settings. It would be
recommended where this option is used, you do not select the “Repeat
Announcement” option.
IVR
Rules
The only child controls you can add to an IVR Welcome
message are Digit controls/menu options; there are no other valid children of
this control.
The IVR Welcome message must have at least one child Digit
defined and one Digit (Invalid key) action defined.
IVR Welcome messages can be nested to build up multiple
layers but the parent node will be a Digit control rather than another IVR
Welcome message.
You must select a pre-recorded announcement within the IVR
properties or the call plan will fail to validate.
You cannot add any sibling controls alongside an IVR Welcome
message control.
The Incorrect Key is mandatory when an IVR is
configured.
IVR
Input Fields and Buttons
|
Name |
Type |
Description |
|
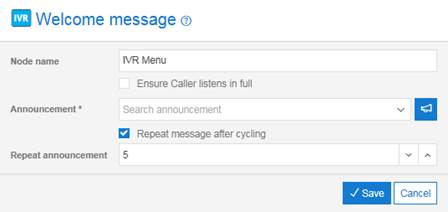
Control label |
Text |
Enter a suitable name for the control in the control label
box. If the label is meaningful it will help to make your call plan
understandable. |
|
Ensure caller listens in full |
Check box |
If the box is unchecked then callers may select an option
before the message has completed playing. Check the box if you wish callers to listen to the message in
full before they can select an option. For example, frequent callers may
learn your IVR structure and be in the habit of pressing the digits they
require without listening to the message. However, you may wish to prevent
this if you have recently updated the IVR with new options. |
|
Announcement |
Drop down |
The drop down list shows all the announcements that are
available for you to play. These are the announcements that have been
uploaded using the Announcement tab. |
|
|
Button |
You can listen to your announcement by clicking on the play
button. |
|
|
Button |
Click this button to play the Announcement. |
|
|
Button |
Click on this to upload a bespoke Announcement to the node. |
|
Repeat message after cycling |
Check box |
If unchecked then the announcement will not be repeated if the
caller fails to press a key. If Checked then the Repeat announcement drop down will become
active. This will allow you to specify how often to repeat the announcement
if the caller fails to press a key to select an option. |
|
Repeat announcement |
Drop down |
Select the number of times to repeat the message before
terminating the call if no option is selected. |