Date/Time
Date/Time Description
You can use the Date/Time control to define different call
routing for different date ranges and different time ranges within those dates.
For example, you might want to specify special handling for specific times
during bank holidays. The call plan below illustrates a call plan that plays a
unique announcement for a specific time during each public holiday (Good Friday
and Easter day) which means that your message can be tailored to the holiday
season if desired.
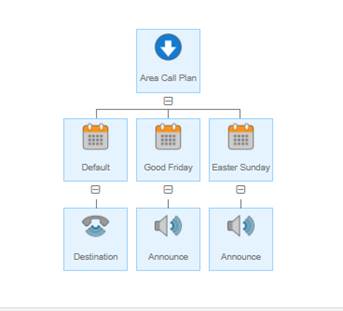
The above plan uses a different date control for Good Friday
and Easter day, however, a single control can be used for the same function, as
in the example below.
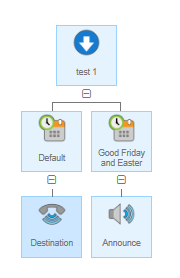
The date/time control used in the call plan above has all of
the date and time ranges defined in a single control as shown below.
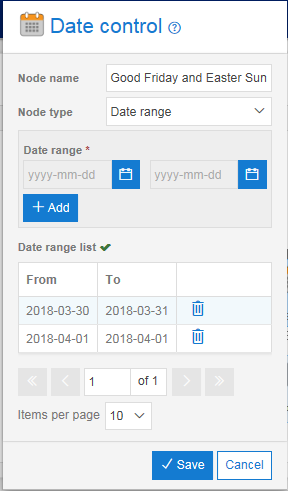
Each date and time range defined in a Date/Time control is
only available within that specific control. If you want to use this Date/Time
control across multiple call plans or numbers, then these could be used as part
of Shared Values.
Date/Time Rules
Each Date/Time control within a sibling group must be
unique, that is you cannot have overlapping dates and times within a sibling
group of Date/Time controls. Call plans will fail to validate if such
structures are present.
The Date/Time control will not permit you to add start dates
that are in the past, but you can pick the current date.
The Date/Time control will not allow you to select a Start Date
that is after the End Date.
When using Date/Time controls there must always be a Date/Time
with node type Default present.
There can be only one default Date/Time control for each
sibling group of Date/Time controls. It may be possible during the call plan
edit to have multiple Date/Time controls set to the Default node type but this
will not validate until there is only one.
Start Time must be before the End Time within the Time range
of the Day/Time control.
Date/Time Input Fields and Buttons
If you want to create a node which gives you the ability to
set rules on a date and time basis then you can select the date/time control
from the control features list. You will notice when you come to modify this
that the node type is set to "Date/Time Range"
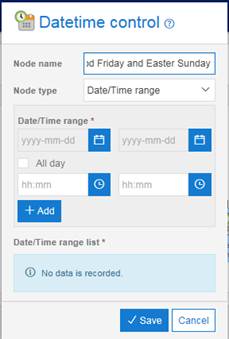
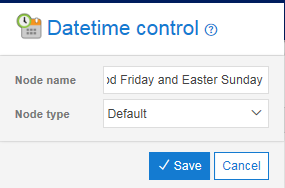
The screen shot below shows the Date/Time control properties
box with the node type “Default” selected.
|
Name |
Type |
Description |
|
Name |
Text input field |
Enter a meaningful
name for the control to make the call plan more understandable. The maximum name
length is 255 characters though only the first 16 will be visible on the icon
when viewing the call plan. |
|
Node type |
Drop down |
You can select
either Default or Date/Time range or Shared Date/Time from the drop down
list. Date/Time range If you select the
Date/Time range option then the date range features are displayed to enable
you to define your own date ranges. The Times can also be selected which
could be either “All Day” or specific start and end times. This branch of the
call plan will then be active on the dates and the times selected. Default If your Date/Time
control does not cover all seven days of the week, a Default node type must
be present. This branch of the call plan will be used to route any call on
dates not specifically covered by the Date/Time controls. You can use this to
define a routing action to cover dates when the office is closed such as
weekends. Shared Date/Time If you select the
Shared Date/Time option then you will see a list of the Shared Date/Time
ranges. One of those Shared Date/Time ranges can be selected to be the
Date/Time range for this node. This branch of the call plan will then be
active on the dates and the times as designed in the Shared Date/Time range. |
|
From / To |
Display window |
The display window
shows the date and time ranges that have been defined for this control. |
|
From input |
Calendar |
If you click on
the From input box or the calendar icon to the right of it you will be
presented with a calendar display. Select the start date of the range that
you wish to define. If you want the
control to be in place for the entire day for the date selected, then you can
check the “All day” check box. If not, you can select explicit start time and
end time between 00:00:00 and 23:59:59. |
|
To input |
Calendar |
If you click on
the To input box or the calendar icon to the right of it you will be
presented with a calendar display. Select the end date of the range that you
wish to define. If not, you can select explicit start time and end time
between 00:00:00 and 23:59:59. |
|
Add |
Button |
Once a date/time
range is entered in the To and From input boxes the Add button must be
clicked to add it to the list of ranges. |
|
Delete |
Button |
A date/time range
can be removed from the list by highlighting it and then clicking on Delete. |