Build my call plan
Build my plan call plan Access Restrictions:
|
Customer |
Customer must have subscribed to Contact
Point, Contact Path or Contact Pro |
|
User |
Must have Point my number enabled Must have access to the numbers enabled |
In order to be able to access the Build my plan screen your
user profile must have the Point my number role enabled.
Description
The Build my call plan page is the main functional area of
the Myinbound website. It is this page that gives you
the power to build sophisticated call plans for managing incoming calls.
The features available within the Build my call plan page
are dictated by the services that your company has subscribed to. For example,
call recording functions are only available where your company has subscribed
to Call recording as an add–on service.
Refer to your service provider for an up-to-date list of
features and services available with the Myinbound
products.
In order to get into the build my call plan screen, you will
need to select the open function from "point my number" screen
against a specific number. From here you will be able to see a list of the call
plans you currently have created.
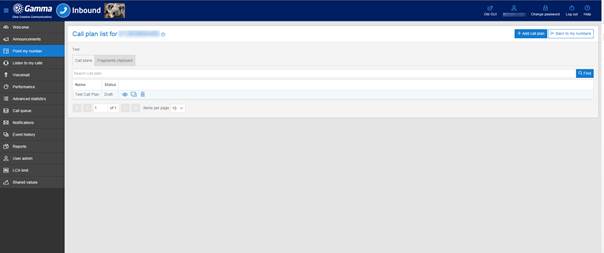
You will notice that against each call plan you have 3
options to seelct from, these options allow you to
open, copy or delete a call plan. These are fairly self-explanatory, however
there are some advanced options you can take advantage of when copying a call
plan, for further information on these options please see the "Copy Call
Plan" section below.
When a call plan is validated, there is the option to tick
the Make this my BC box before closing the call plan,
thus enabling the user to pre designate a call plan to be used in the event of
a Disaster Recovery situation such as an office evacuation. When selected as a
BC plan, the call plan status will be displayed as "BC-Active".

When the BC plan is active (see Point my Number page for how
to do this), it will appear in red as the active call plan as shown here:

The previously active call plan will revert to validated
status. Providing no changes are made to the last active call plan, it can be
reinstated using the Manage my BC function on the Point my Number page.
Copy Call Plan
When the Copy button is selected the window below is
displayed.
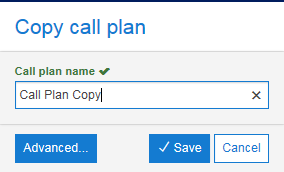
If you simply want to make a copy of the call plan available
within the same number then enter the name of the copy and click on the Save
button.
If you want to copy call plans between different numbers
then use the Advanced button.
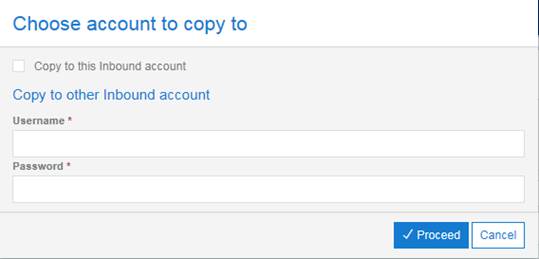
If the call plan is to be copied to other numbers within the
same inbound account then check the Copy to this Inbound
account box. This will cause the window below to be displayed.
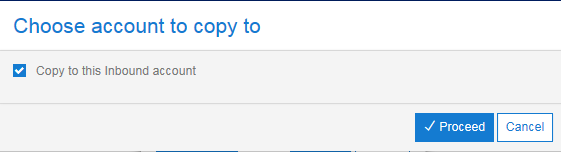
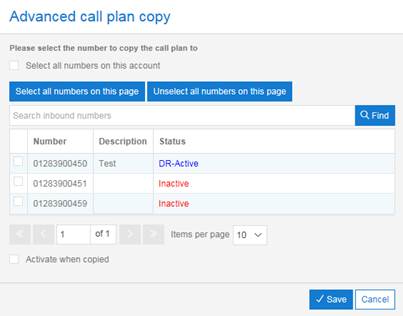
Click on the Proceed button and you will be presented with a
window like the one below showing the numbers available for you to copy your
call plan to. Simple select the required numbers and then click on Save.
If you want the call plan to activate automatically when the
plan is copied to the new number then check the Activate when copied check box.
Please note, the call plan must already have been
validated for this option to be available; if the plan has not been validated
then the Activate when copied check box will not appear.
Then click on Save again when presented with the screen
below.
In order to copy to numbers within another account the
destination account logon details must be entered when presented with the
screen below but otherwise the process is the same as copying to another number
in the same account.

Notes
When a call plan is copied to another account the
destination account must belong to the same channel partner.
When copying between accounts, any announcements used within
the call plan will be copied across with the call plan.
The Activate when copied check box only appears if the call
plan being copied has been validated or activated.
General Rules
There are some general rules you should be aware of when
building your call plan. An understanding of these will help you in
understanding what a valid call plan looks like.
In general, a group of siblings must all be of the same
type, e.g. Date controls, or Day controls. If you try to add a sibling that is
of a different type then the website will not allow this. However, there is an
exception to this rule. The special case is the Divert control which can be a
sibling of a Destination or a Distribution control.
Within a group of siblings there can be only one control set
to be the Default. In order to allow flexibility when building the call plan it
is possible to add multiple Default controls during the edit stage. However, a
call plan with multiple Default controls will be rejected when it is validated.
There is a maximum of 1000 controls that can be added to a
call plan. This is far more than any real call plan should need so if you reach
this limit then you should re-asses your call plan design.